Moving to Japan as an international student is an exciting adventure filled with new experiences and opportunities. To help you settle in smoothly, here’s a straightforward guide covering the essential steps you need to take after arriving in Japan.
1. Register at City Hall
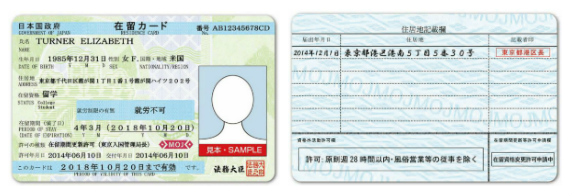
Within 14 days of moving into your new residence in Japan, you must visit your local city or ward office to complete your resident registration (Notification of Moving In). Bring your passport and residence card (if you received one at the airport). If your residence card was not issued at entry, it will be mailed to your address after registration. This process officially records your address in Japan and is necessary for many other procedures.
After registering, you will also receive your “My Number” (Individual Number), which is used for social security and tax purposes. Keep the notification card in a safe place, as you’ll need it for various administrative tasks.

2. Enroll in National Health Insurance
All international students staying in Japan for more than three months are required to enroll in the National Health Insurance (NHI) system. You can do this at the same city hall where you registered your address. With NHI, you only pay 30% of most medical costs, making healthcare affordable and accessible. Be sure to bring your residence card and proof of student status when applying.
3. Visit your School
Once you have your address registered and your insurance, you are ready to visit the school to submit your documents and receive information about the entrance ceremony and placement tests. At the school you will need to take your residence card, passport and your Entrance Certificate (入学許可書). Once you have been registered within the school system, you are ready to begin classes. Typically there will be a placement test and entrance ceremony held around one week to a few days before class starts. For the placement test. make sure to bring a pencil and eraser.
4. Get a Japanese Phone Number
Having a Japanese phone number is essential for daily life, including opening a bank account, renting an apartment, and staying connected. There are two main ways to get a phone number:
- Online: Order a SIM card or eSIM before or after arriving. Providers like Mobal and Sakura Mobile offer English support and airport pickup, making this a convenient option.
- In-Store: Visit a mobile carrier (e.g., Docomo, SoftBank, au, Y-Mobile) with your residence card, passport, and a payment method. Note that in-store applications may take several hours and English support can be limited.
Choose a voice + data plan (not just data) to receive a real Japanese phone number. This will be essential for when you seek part-time work.
5. Open a Bank Account
Most banks require your residence card, passport, proof of address (printed on the back of your residence card), a student card, and sometimes a Japanese phone number. For your first 6 months, you can only apply at JP Bank (Japan Post) and there can be long waits to register. Having a local bank account is important for managing finances, receiving funds from family, or getting paid for part-time work.
6. Other Useful Tips
- Housing: Arrange your accommodation before arrival, whether it’s a dormitory or private apartment. Finding something last minute is not usually possible.
- Personal Seal (Inkan): Some procedures may require a personal seal, but your signature is often accepted. However the seal is recommended for ease of use.
- Part-Time Work: If you wish to work, apply for “Permission to Engage in Activity Other Than That Permitted by the Status of Residence” at immigration. Ideally this should have been done on arrival in Japan.
Starting your student life in Japan involves a few key administrative steps, but once completed, you’ll be ready to enjoy your studies and explore everything Japan has to offer. Welcome to Japan, and best of luck with your new adventure!

